English :
Understanding the handler:
Handler user interface! What is it?
Handler User Interface (HandlerUI) is the resultant appearance to ask for input from the user to compose the program who has planted a dynamic variable in java application
User Requirements:
1. Wireless Toolkit 2.5.2. (Or newer versy can)
2. Java Development Kit (I use the JDK 1.6 update 7).
3. Text Editor (notepad ato can use other tools).
How to use:
1. Open the jar file with the handler who has finished using WinZip, extract all
his file to a folder without selecting his file. Suppose we extract the folder
c: \ test1
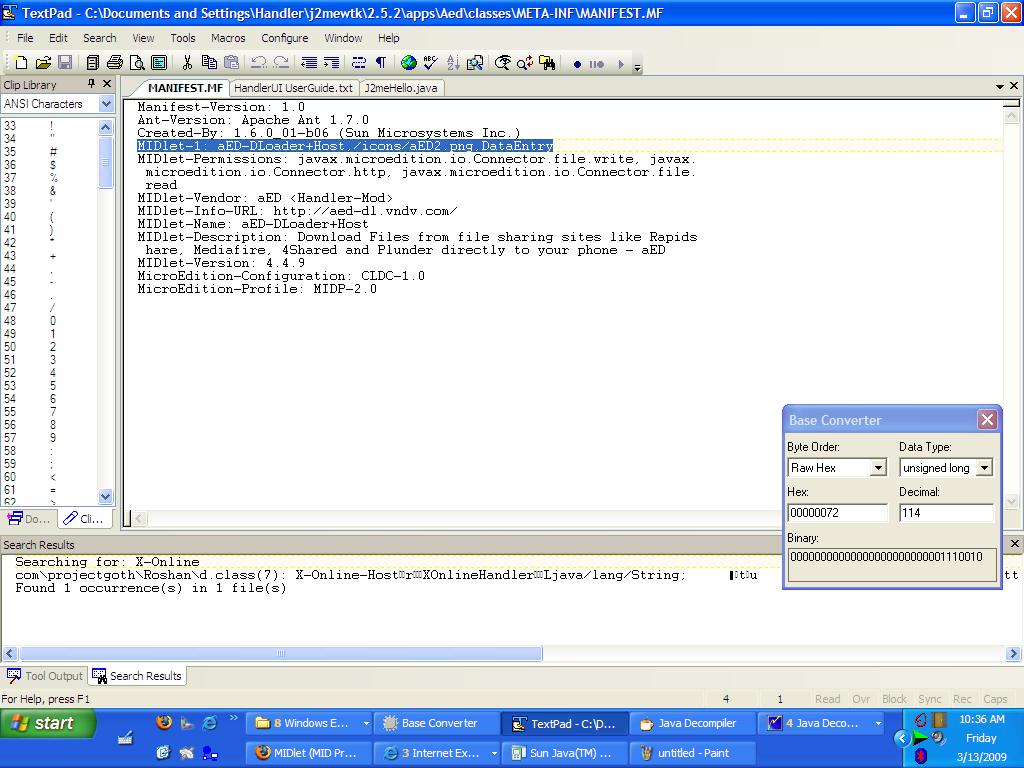
2. Go to the folder, it will be found kt META-INF folder (if ill-found, mean one in step 1, repeat these steps with BNR). Log into the META-INF folder TSB, open the MANIFEST.MF with using Notepad. See lah in part
"MIDlet-1:"
for example:
MIDlet-1: AED-DLoader + Host, / icons/aED2.png, DataEntry
look at the last parameter (here is DataEntry). See pic below for more details.

Record these parameters pronouncedly (NOTE: text in java adl case sensitive dmana capital and lowercase letters are different).
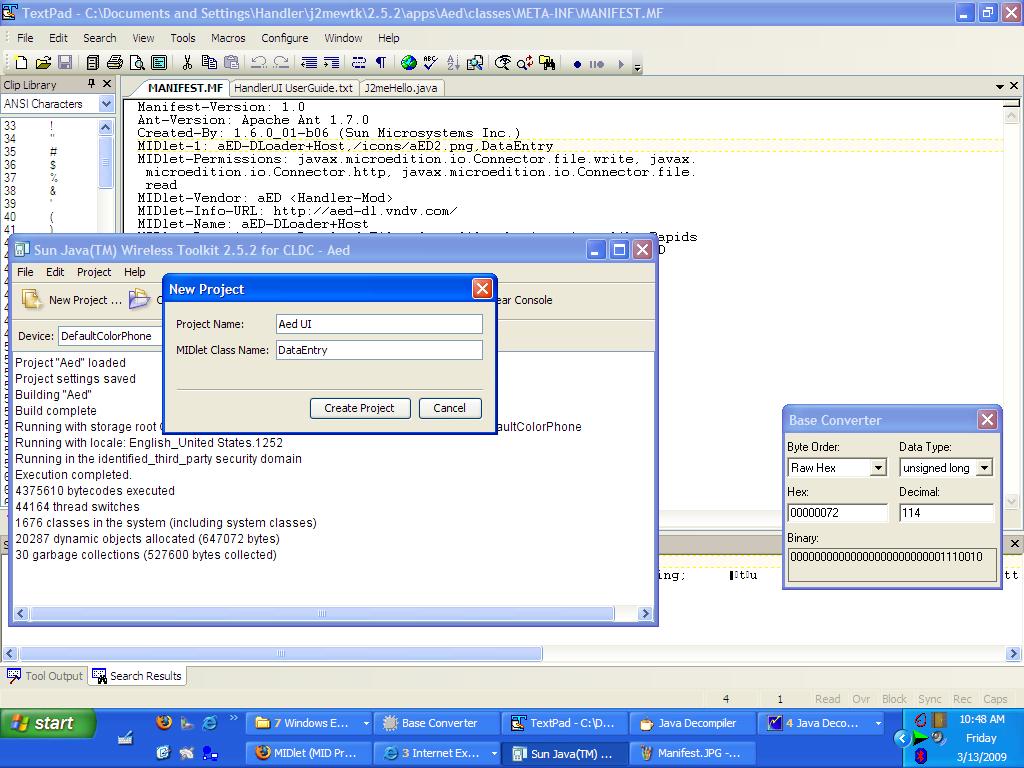
3. Wireless Toolkit 2.5.2 Run from the Start menu. Then choose New Project
Fill in the Project name in vain. The contents of the MIDlet class name with the last parameter
Point No. 2 td (REMEMBER! Case Sensitive). Ak fill it as follows:
Project Name: AED UI
MIDlet Class Name: DataEntry
Press the Create Project button.
See pic below for more details

Then the window will exit the Settings For Project "AED UI",
Just press OK without changing anything.
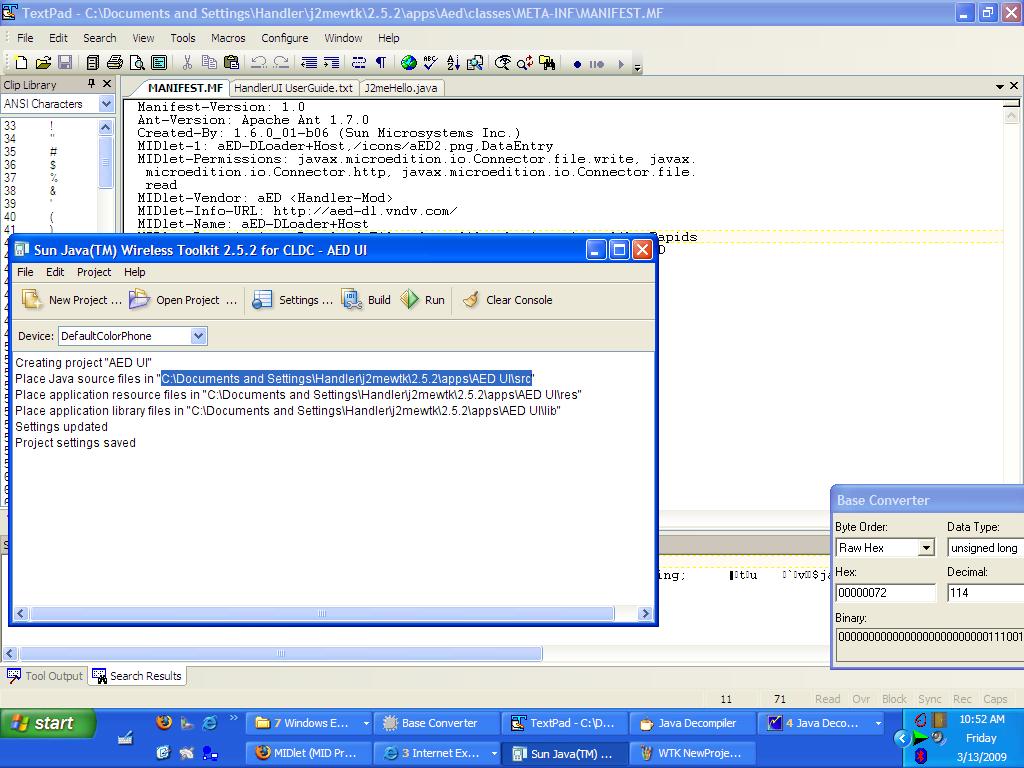
4. Look at the Wireless Toolkit window will be no posts as follows:
Place Java source files in "C: \ Documents and Settings \ Handler \ j2mewtk \ 2.5.2 \ apps \ AED UI \ src"
See pic below for more details

Open the folder.
Copy paste is "HandlerUI.java and Template.java" from the folder "Src Files" folder TSB.
5. Rename is Template.java be the name on point No. 2 (DataEntry.java).
6. Open with notepad DataEntry.java see is part of:
public class Template extends MIDlet
Template change to become such a DataEntry follows:
public class extends MIDlet DataEntry
Save the file.
7. HandlerUI.java Open with notepad, and change all the text "Templates"
become "DataEntry". Liat part and given a comment like the following:
//*********************************
then change his seperlu. then save.
8. Back to the Wireless Toolkit window and press the Build button.
9. The results will be in place in a
C: \ Documents and Settings \ ****** \ j2mewtk \ 2.5.2 \ apps \ AED UI \ classes
Adl which need attention, it only files HandlerUI.class pot
kt need. Copy files to a folder HandlerUI.class TSB c: \ test1 (see
No. 1.
10. Select All file2 and existing folders in the folder Test TSB (CTRL + A) then
Right click and Add to Zip File ... Change. Zip jd. Jar ...
Handler user interface! What is it?
Handler User Interface (HandlerUI) is the resultant appearance to ask for input from the user to compose the program who has planted a dynamic variable in java application
User Requirements:
1. Wireless Toolkit 2.5.2. (Or newer versy can)
2. Java Development Kit (I use the JDK 1.6 update 7).
3. Text Editor (notepad ato can use other tools).
How to use:
1. Open the jar file with the handler who has finished using WinZip, extract all
his file to a folder without selecting his file. Suppose we extract the folder
c: \ test1
2. Go to the folder, it will be found kt META-INF folder (if ill-found, mean one in step 1, repeat these steps with BNR). Log into the META-INF folder TSB, open the MANIFEST.MF with using Notepad. See lah in part
"MIDlet-1:"
for example:
MIDlet-1: AED-DLoader + Host, / icons/aED2.png, DataEntry
look at the last parameter (here is DataEntry). See pic below for more details.

Record these parameters pronouncedly (NOTE: text in java adl case sensitive dmana capital and lowercase letters are different).
3. Wireless Toolkit 2.5.2 Run from the Start menu. Then choose New Project
Fill in the Project name in vain. The contents of the MIDlet class name with the last parameter
Point No. 2 td (REMEMBER! Case Sensitive). Ak fill it as follows:
Project Name: AED UI
MIDlet Class Name: DataEntry
Press the Create Project button.
See pic below for more details

Then the window will exit the Settings For Project "AED UI",
Just press OK without changing anything.
4. Look at the Wireless Toolkit window will be no posts as follows:
Place Java source files in "C: \ Documents and Settings \ Handler \ j2mewtk \ 2.5.2 \ apps \ AED UI \ src"
See pic below for more details

Open the folder.
Copy paste is "HandlerUI.java and Template.java" from the folder "Src Files" folder TSB.
5. Rename is Template.java be the name on point No. 2 (DataEntry.java).
6. Open with notepad DataEntry.java see is part of:
public class Template extends MIDlet
Template change to become such a DataEntry follows:
public class extends MIDlet DataEntry
Save the file.
7. HandlerUI.java Open with notepad, and change all the text "Templates"
become "DataEntry". Liat part and given a comment like the following:
//*********************************
then change his seperlu. then save.
8. Back to the Wireless Toolkit window and press the Build button.
9. The results will be in place in a
C: \ Documents and Settings \ ****** \ j2mewtk \ 2.5.2 \ apps \ AED UI \ classes
Adl which need attention, it only files HandlerUI.class pot
kt need. Copy files to a folder HandlerUI.class TSB c: \ test1 (see
No. 1.
10. Select All file2 and existing folders in the folder Test TSB (CTRL + A) then
Right click and Add to Zip File ... Change. Zip jd. Jar ...
Translate In Indonesia :
Pengertian handler :
Handler user interface!!! Apakah itu?
Handler User Interface (HandlerUI) adalah tampilan yg dihasilkan utk meminta input dari pengguna program utk menggubah variable dinamis yg telah ditanam pada aplikasi java
User Requirement:
1. Wireless Toolkit 2.5.2. (atau versy lebih baru bisa)
2. Java Development Kit (aku pake JDK 1.6 update 7).
3. Text Editor (Bisa menggunakan notepad ato tools lainnya).
Cara penggunaan:
1. Buka file jar yg telah jadi handler dgn menggunakan winzip, extract semua
file nya ke suatu folder tanpa memilih file nya. Misalkan kita extract di folder
c:\test1
2. Masuk ke folder tersebut, maka akan kt temukan folder META-INF (jika tdk ditemukan, berarti salah pada langkah 1 , ulangi langkah tersebut dgn bnr). Masuk ke folder META-INF tsb, buka Manifest.mf dgn menggunakan Notepad. Lihat lah pada bagian
"MIDlet-1:"
misalnya:
MIDlet-1: aED-DLoader+Host,/icons/aED2.png,DataEntry
lihatlah parameter terakhir (disini adalah DataEntry). Lihat gbr dibawah ini utk lebih jelasnya.

Catatlah dgn jelas parameter tersebut (PERHATIAN: text pada java adl case sensitif dmana huruf besar dan kecil adalah berbeda).
3. Jalankan Wireless Toolkit 2.5.2 dari Start menu. Kemudian pilihlah New Project
Isi Project name sembarangan. Isi MIDlet Class name dgn parameter terakhir pada
point no 2 td (INGAT!!! Case Sensitif). Ak mengisi nya sbg berikut:
Project Name: AED UI
MIDlet Class NAme: DataEntry
Tekan tombol Create Project.
Lihat gbr berikut untuk lebih jelasnya

Maka akan keluar window Settings For Project "AED UI",
tekan Ok saja tanpa merubah apapun.
4. Lihatlah window Wireless Toolkit akan ada tulisan seperti berikut:
Place Java source files in "C:\Documents and Settings\Handler\j2mewtk\2.5.2\apps\AED UI\src"
Lihat gbr dibawah ini utk lebih jelasnya

Bukalah folder tersebut.
Copy paste lah "HandlerUI.java dan Template.java" dari folder "Src File" ke folder tsb.
5. Rename lah Template.java menjadi nama pada point no 2 (DataEntry.java).
6. Buka DataEntry.java dgn notepad lihat lah bagian:
public class Template extends MIDlet
ubahlah Template menjadi DataEntry sehingga menjadi spt berikut:
public class DataEntry extends MIDlet
Save file tersebut.
7. Buka HandlerUI.java dgn notepad, dan ubahlah semua text "Template"
menjadi "DataEntry". Liat bagian yg diberi comment spt berikut:
//*********************************
lalu ubahlah seperlu nya. kemudian save.
8. Kembali ke window Wireless Toolkit dan tekan tombol Build.
9. Maka hasilnya akan di taruh di
C:\Documents and Settings\******\j2mewtk\2.5.2\apps\AED UI\classes
Yg perlu diperhatikan adl, hanya file HandlerUI.class nya saja yg
kt perlukan. Copy file HandlerUI.class tsb ke folder c:\Test1 (lihat
no 1.
10. Select All file2 dan folder yg ada di folder Test tsb (CTRL+A) lalu
Klik kanan dan Add to Zip File... Ubah .zip jd .jar...
Have Funnnnnnnnnnnnnnnnnnn
-----------------------------------


0 komentar:
Posting Komentar